Tutorial: Building Overspeed Detection Solution on Kaa IoT Platform
In a world that is becoming more and more connected, many things in our environment can be monitored and controlled with IoT devices. IoT technology has many important uses in transportation, where it's crucial to maintain speed limit compliance and safety.
Welcome to our step-by-step tutorial on configuring overspeed detection for your fleet management solution powered by the Kaa IoT Platform. Whether you're a developer aiming to implement advanced IoT functionalities or you represent an organization looking to enhance a fleet management system, this tutorial will offer you the essential insights and steps to set up a reliable overspeed detection system.
By the end of this tutorial, you will have a comprehensive understanding of how to leverage Kaa's features to monitor vehicle speeds effectively, detect instances of overspeeding, and take proactive measures to ensure compliance with speed regulations. So, let's explore how to configure this IoT solution on the Kaa IoT platform.
Prerequisites
To continue with this guide we will need the following:
If you haven't connected a device yet, you can get started on your IoT project by following the tutorial 'Connecting your first device.'
Alert configuration for the fleet management solution
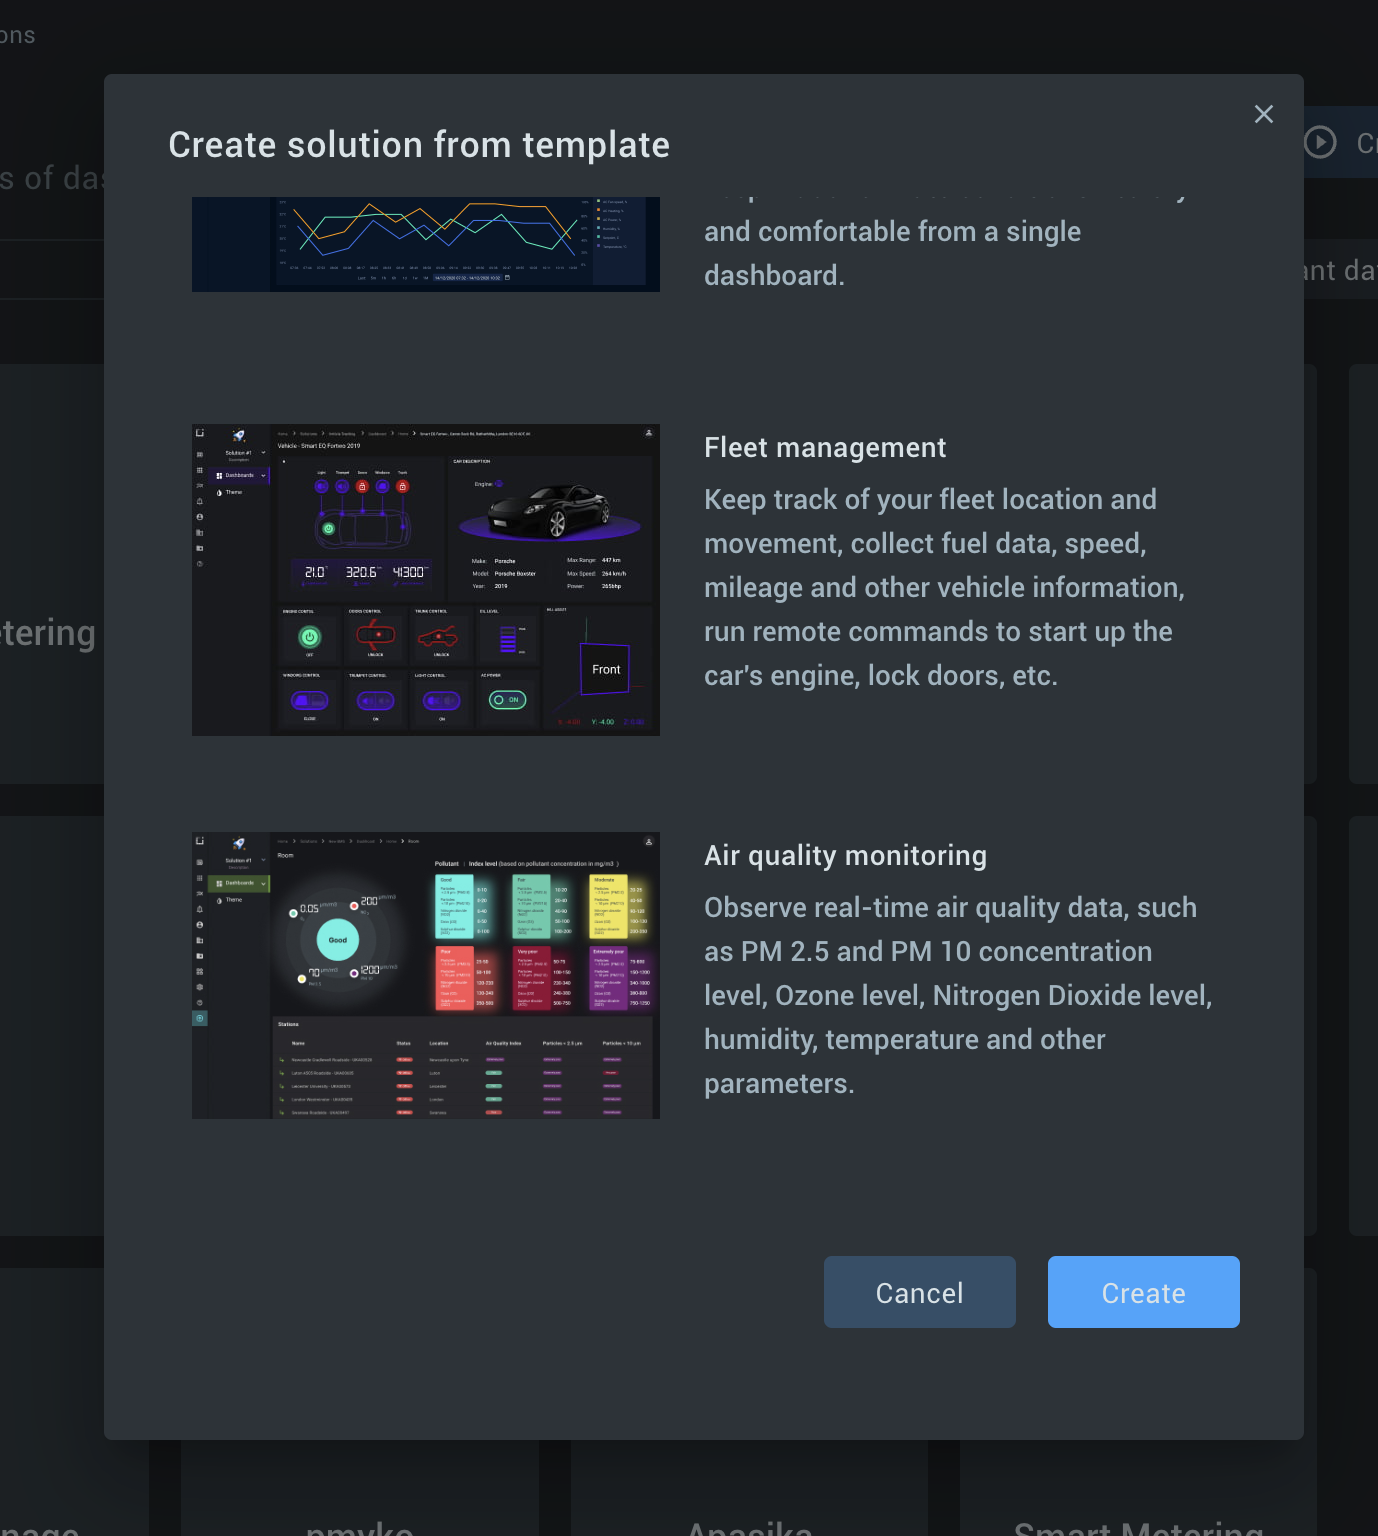
Creating fleet management solution from the Kaa template
Once you've logged into your Kaa Cloud account, navigate to the Solutions tab and click Create solution from template in the top right corner, as shown in the screenshot below.

Select Fleet management and click the Create button.
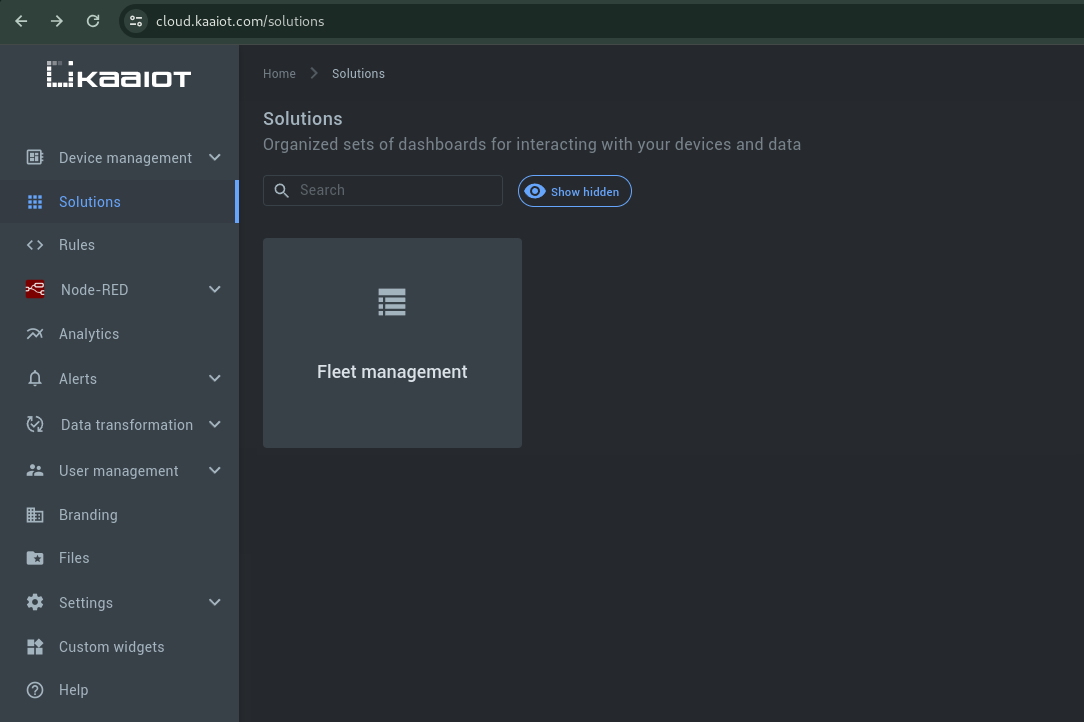
Once the solution is created, you will see the fleet management solution on the Solutions tab, as demonstrated in the screenshot below.
Alert configuration
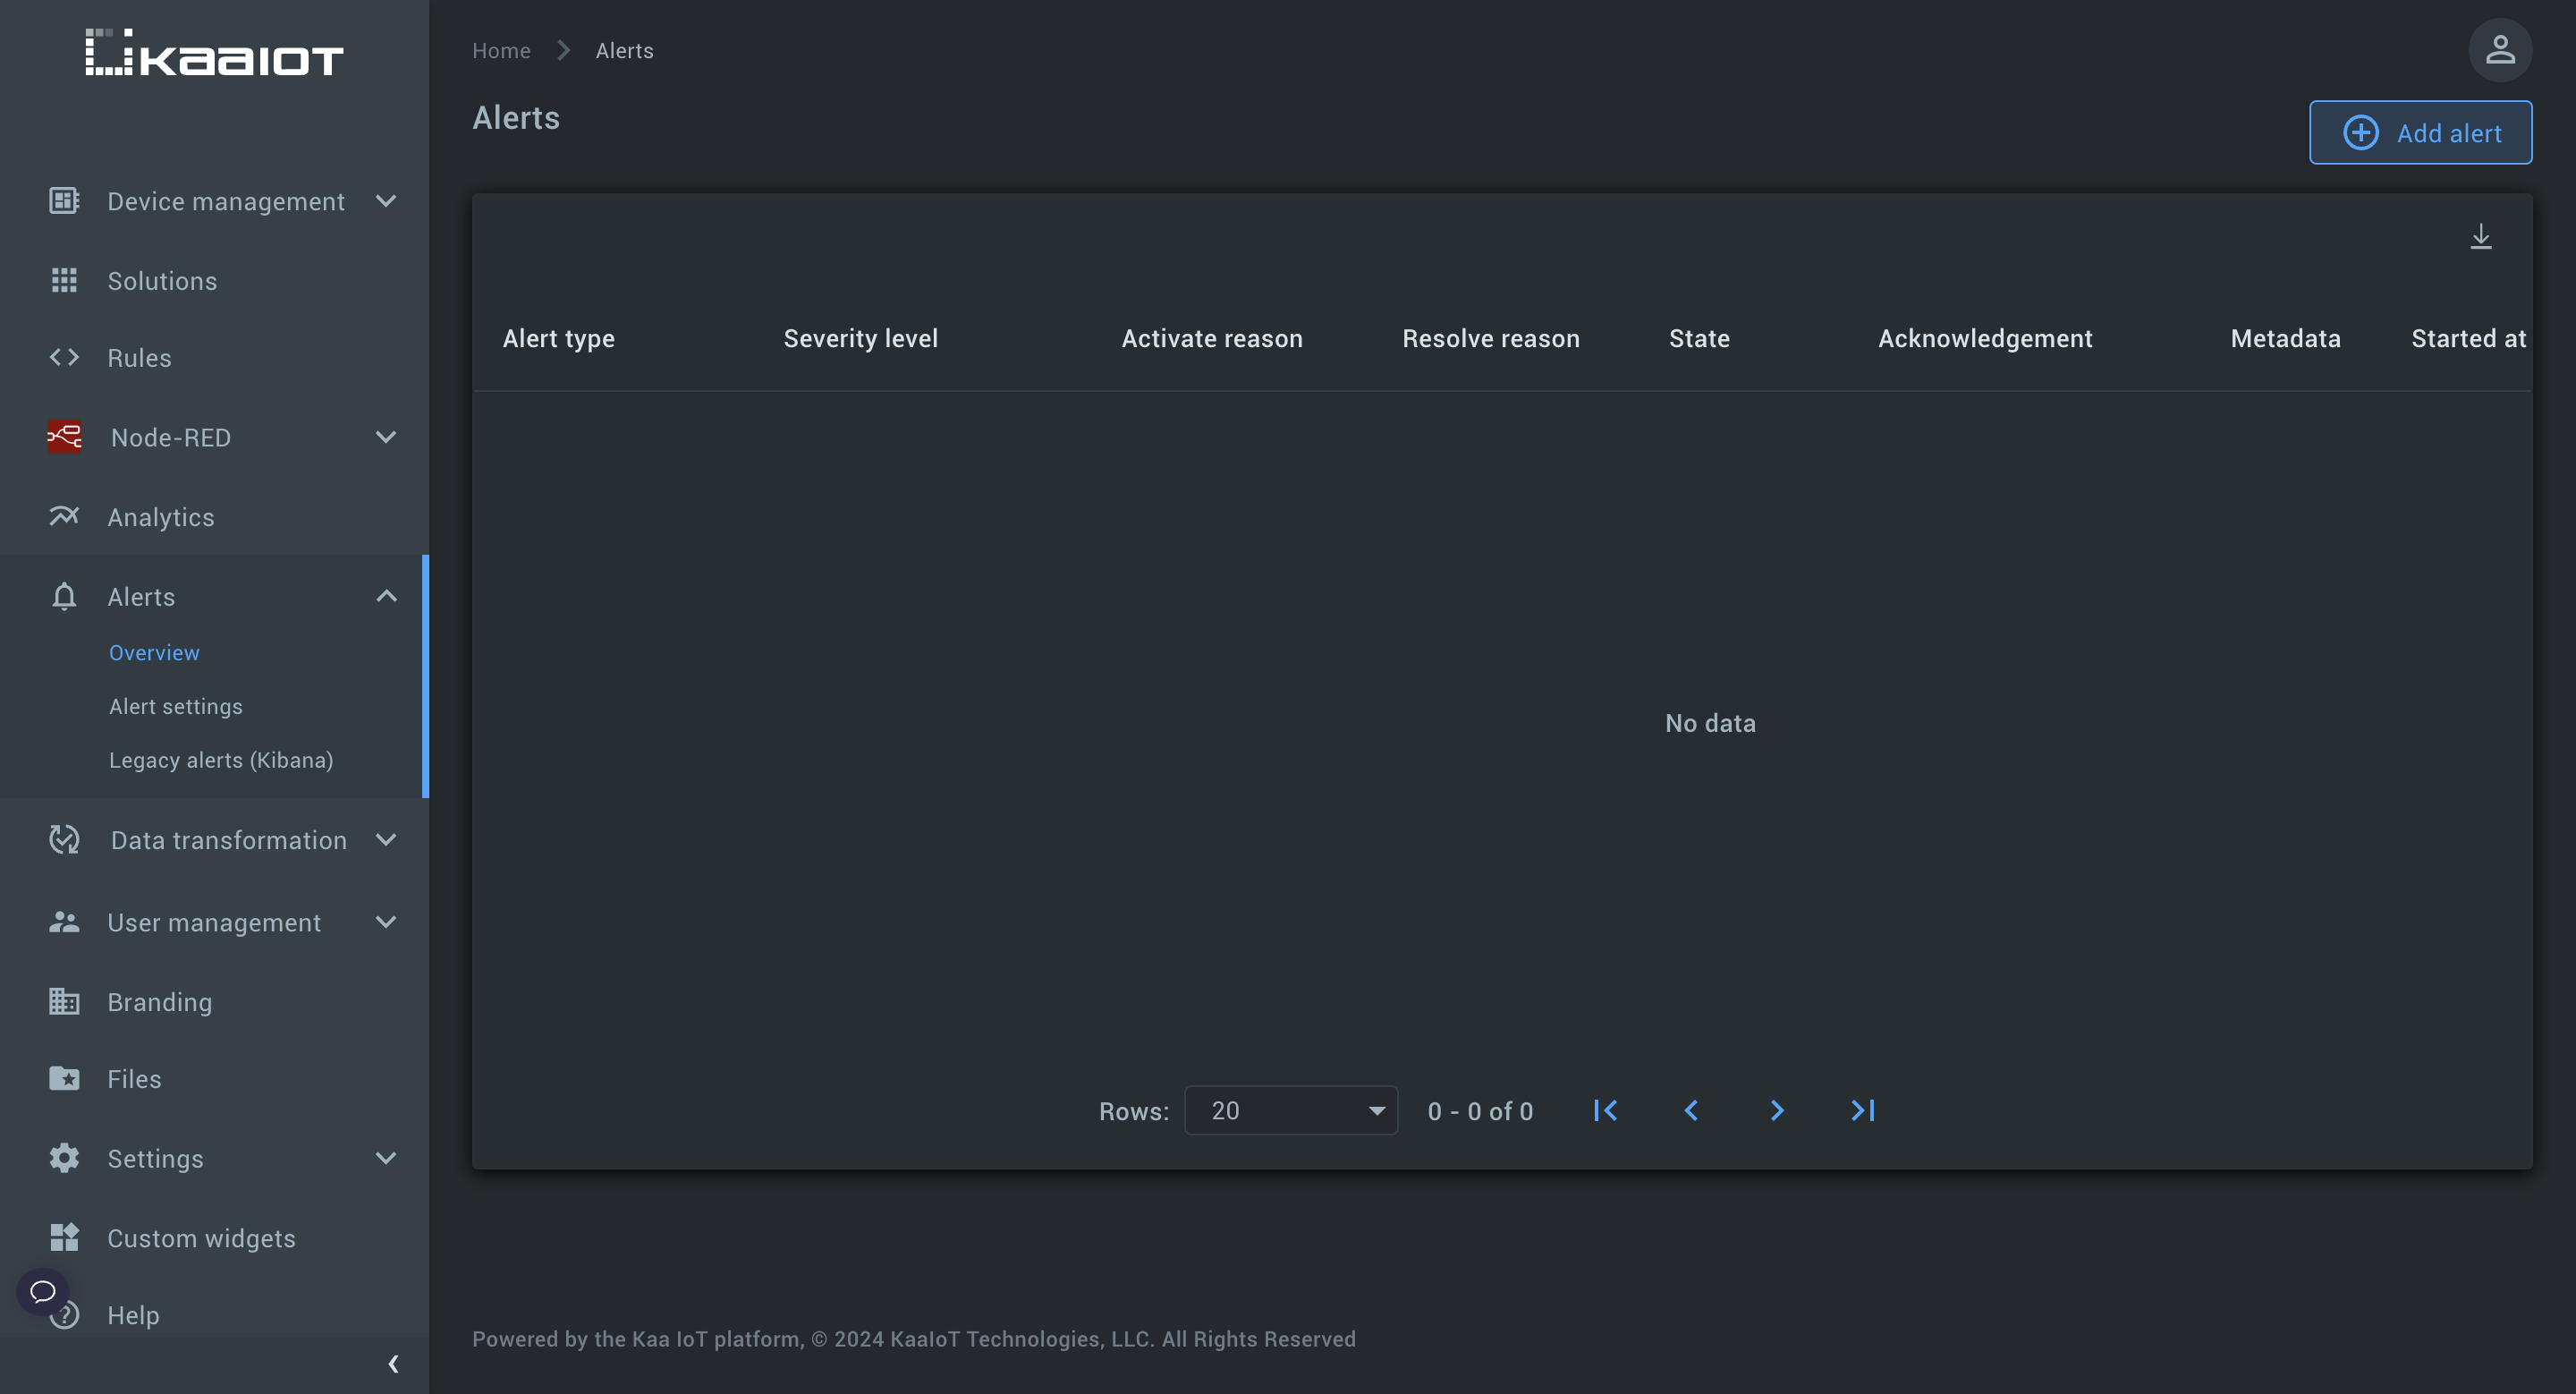
Go to the Alerts tab and click Add alert, as highlighted in the screenshot below.
1. First, we select a solution and specify that the condition check (step 2) should be performed whenever the time series of its endpoints changes.
In general, this condition should be configured as follows:
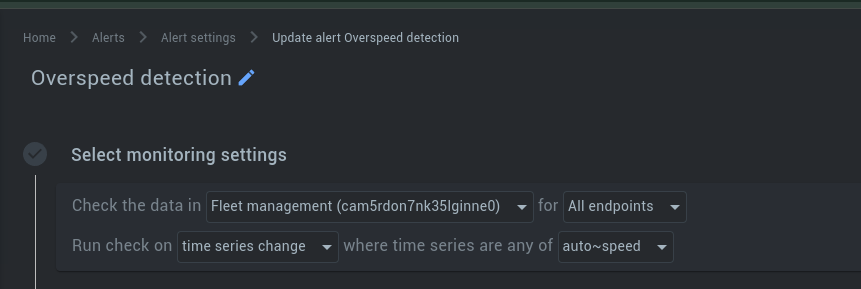
- Check the data in = Fleet management (...)
- for = All endpoints
- Run check on = time series change
- where time series are any of = auto~speed
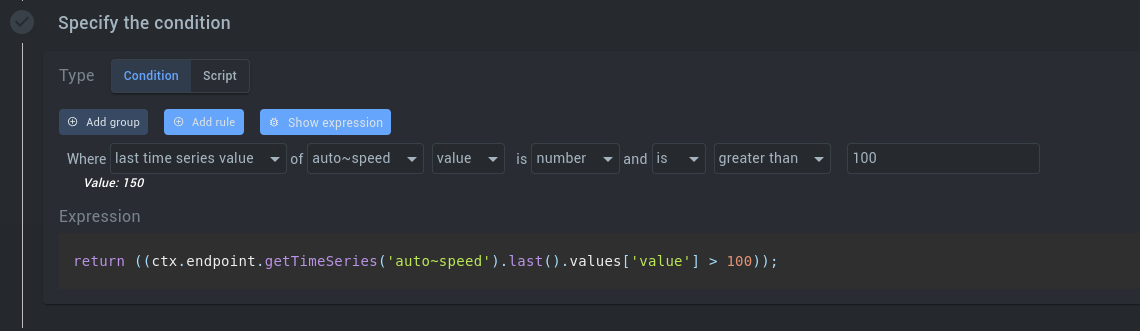
2. Next, we establish the conditions that will trigger an alert. In our case, we have chosen the condition of exceeding the speed limit of more than 100 km/h for demonstration, but you can experiment and write your condition under which the alarm will be triggered.
Here, we're focusing on a single condition: if the speed exceeds 100, the expression evaluates to “true”, signaling the need for an alert to be generated.
The condition will look like this: “last time series value” of “auto~speed” “value” is “number” and “is” “greater than” “100”.
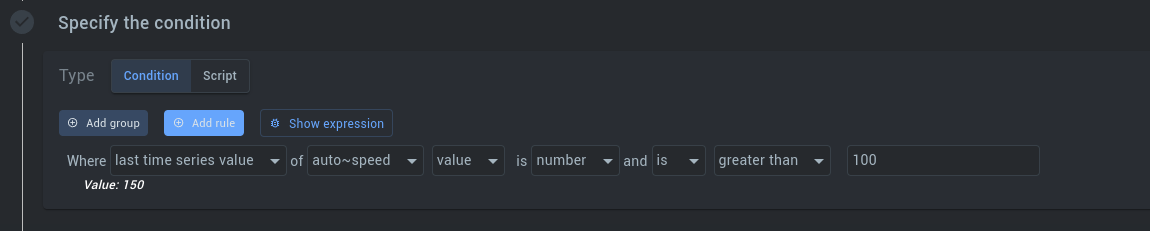
By clicking the Show expression button, you'll see the expression formulated according to our condition.
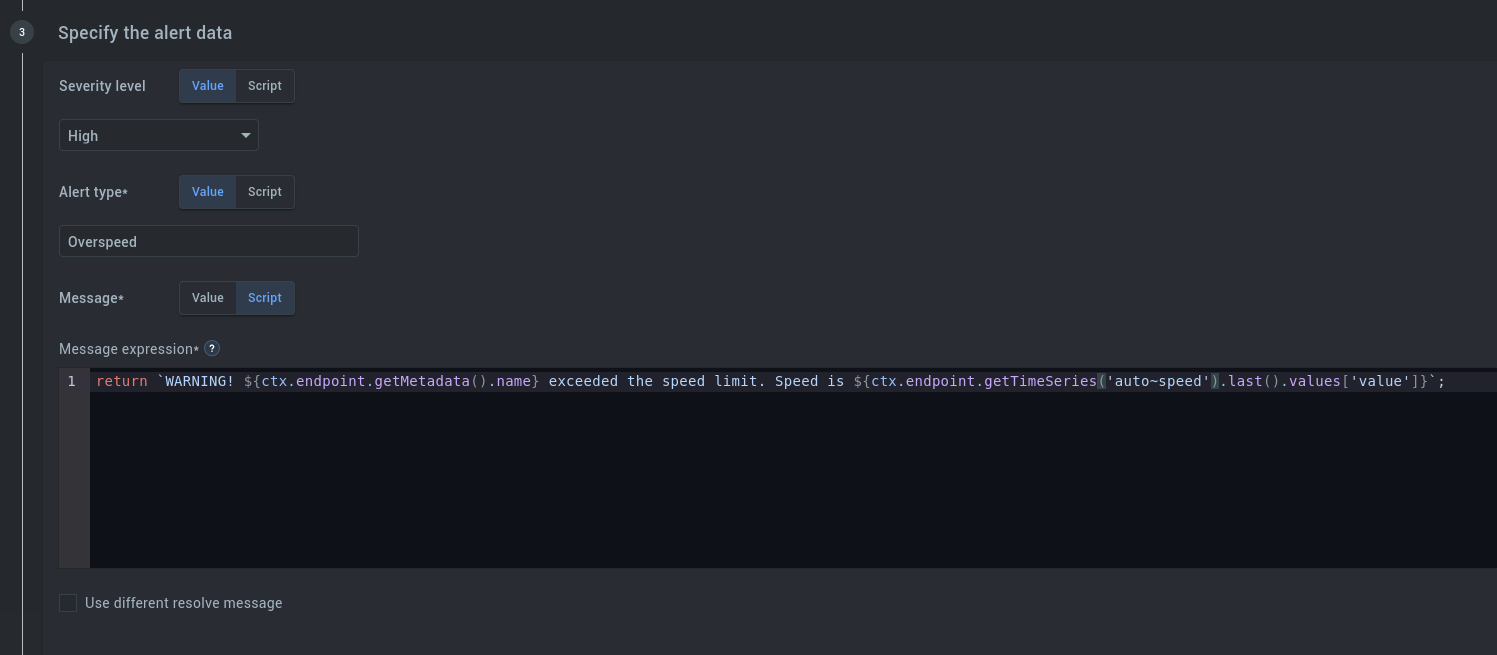
3. Let’s configure the alarm itself.
3.1 Select the Severity level. There are 5 levels of severity: info, low, medium, high, and critical. We selected Critical.
3.2 Create or select the Alert type. We set the alert type to Overspeed.
If your application scenario requires more precise settings, the Script mode will help. In this mode, you can define the Severity level and Alert type parameters dynamically, depending on the state of the device.
3.3 In the Message section, we have enabled the Script mode and set an expression that returns a message that displays the name (from the metadata endpoint) and the current speed of the car (from the time series).
So, our code for the Message expression parameter is as follows:
return `WARNING! ${ctx.endpoint.getMetadata().name} exceeded the speed limit. Speed is ${ctx.endpoint.getTimeSeries('auto~speed').last().values['value']}`
Widget configuration for the fleet management dashboard
Great, we've created a fleet management solution from the template and configured alerts, but it doesn't have a graphical component yet. Let’s create widgets to display Speed, the Alerts list, and Map showing the car's route.
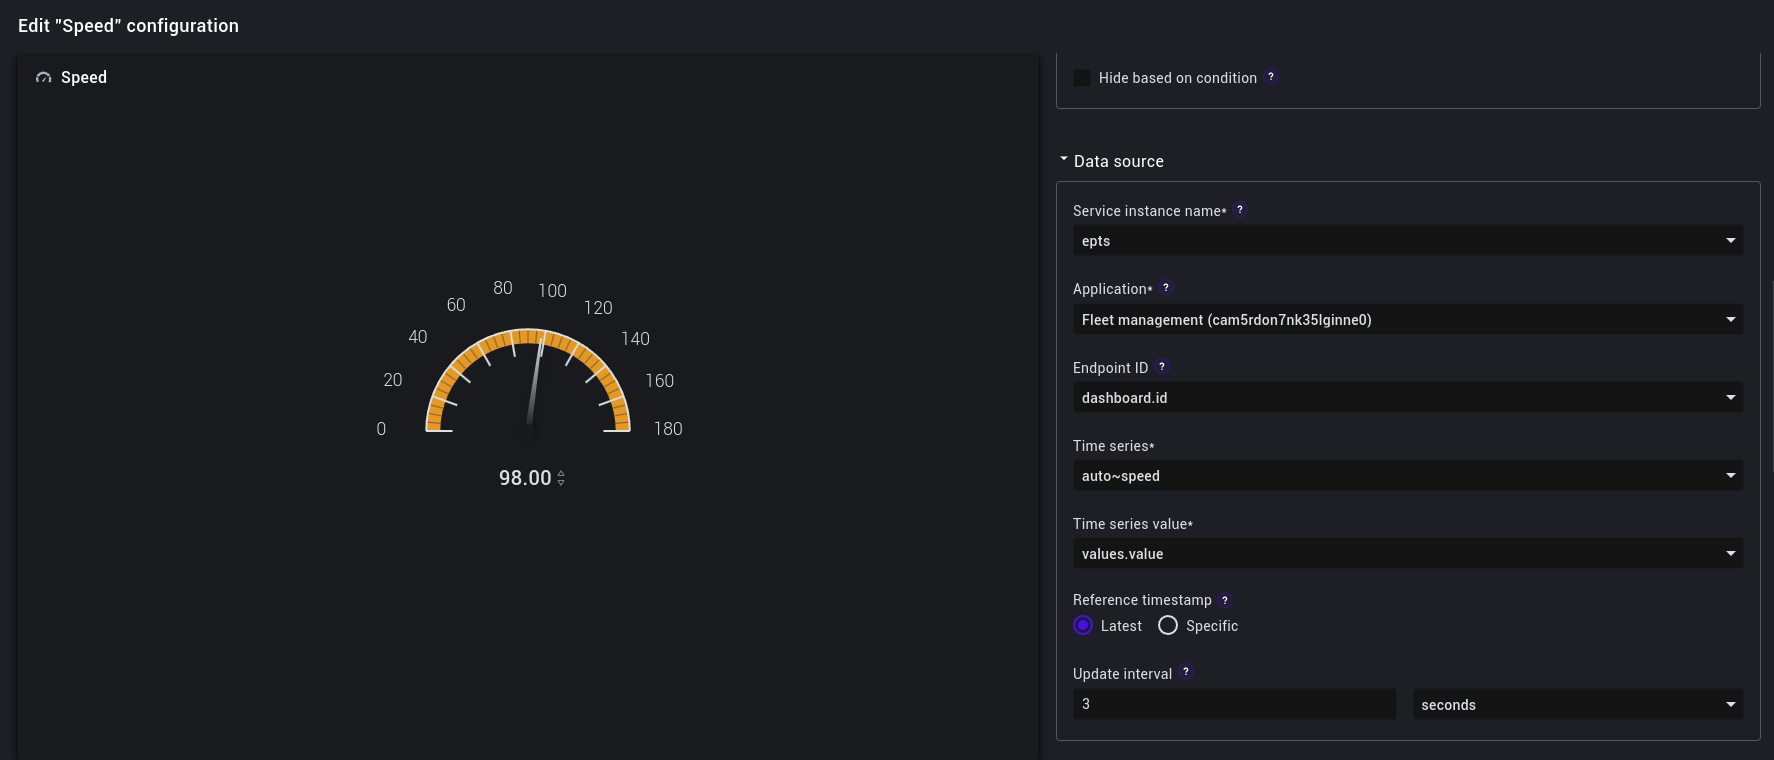
Gauge widget to display speed
1. Go to your solution’s dashboard
2. Make sure you are in the Edit mode and click Add widget
3. Select Gauges and select Radial 180
4. Go to Edit
For the Data Source section, please set the following parameters:
- Service instance name: select epts
- Application: select your solution ("Fleet management (...))
- Endpoint ID: select your dashboard
- Time series: select auto~speed
- Time series value: values.value option
- Reference timestamp: select the Latest
- Update interval: let’s set it to 3 seconds
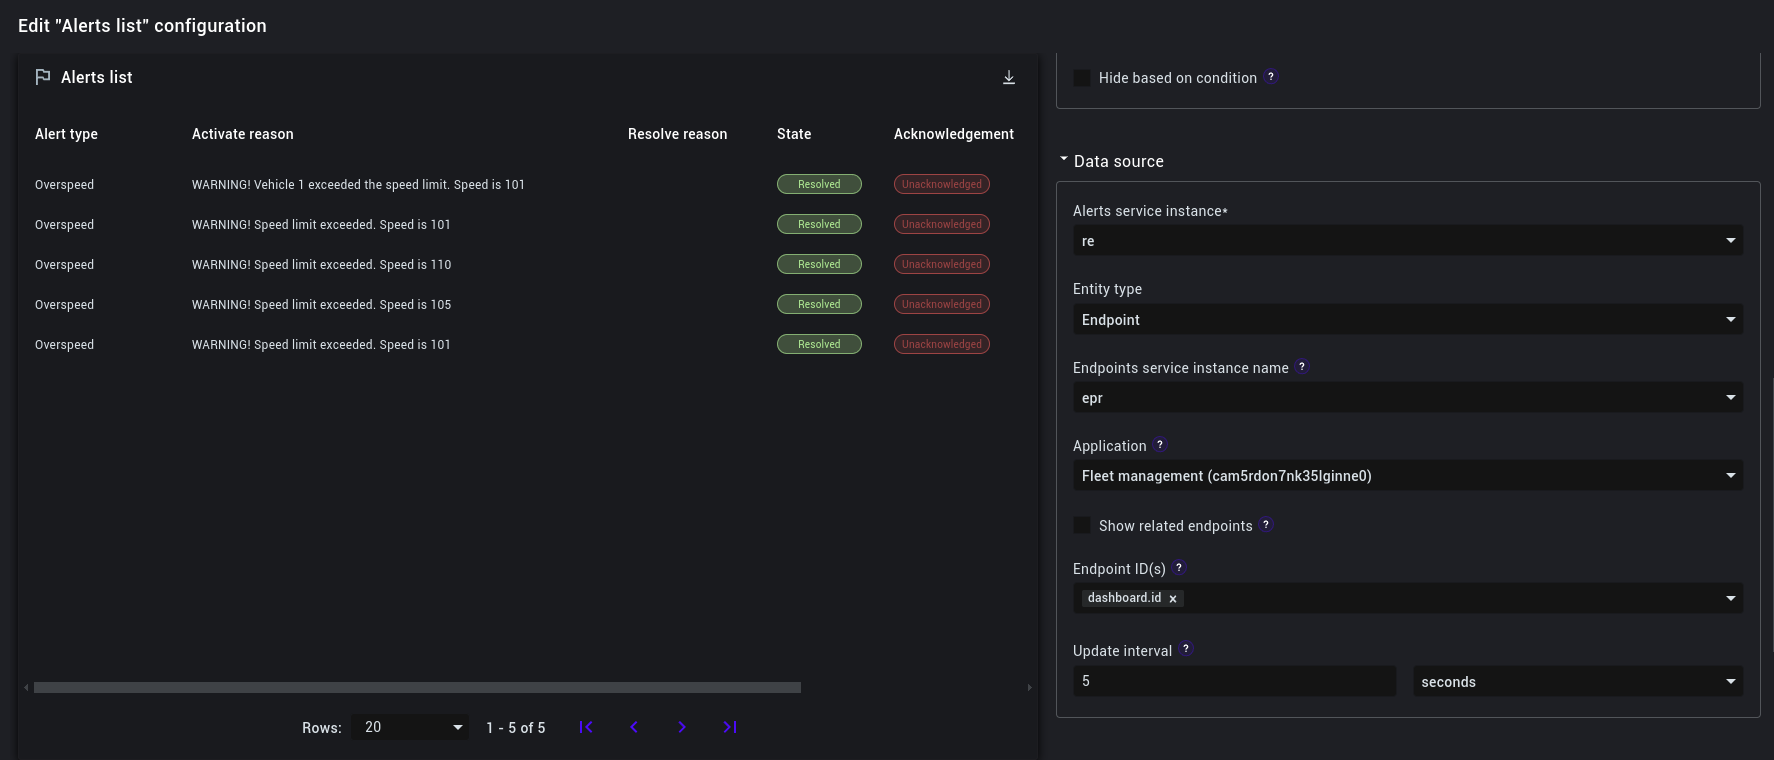
Alerts list widget
The next widget is the Alerts list widget, which displays a list of all current alerts.
1. Go to your solution’s dashboard
2. Make sure you are in the Edit mode and click Add widget
3. Select Device management and then: Alerts list
4. Go to Edit
For the Data Source section, please set the following parameters:
- Alert service instance: select re
- Entity type: select Endpoint
- Endpoints service instance name: select epr
- Application: select your solution ("Fleet management (...))
- Endpoint ID(s): select your dashboard
- Update interval: let’s set it to 5 seconds.
Geopositioning widget for location history
The next widget we need to configure is the Geopositioning widget. This widget will be responsible for displaying the location history of our fleet.
1. Go to your solution’s dashboard
2. Make sure you are in the Edit mode and click Add widget
3. Select Geopositioning widget
4. Go to Edit
For the Data Source section, please set the following parameters:
- Application: select your solution ("Fleet management (...))
- Use data from: select Time series
- Service instance name: select epts
- Time series: select location
- Set the Latitude value parameter to values.latitude
- Set the Longitude value parameter to values.longitude
- Check the Display movement history option
- Switch the Time range parameter to Recent. In the text fields corresponding to this parameter, specify the value "5" "minutes".
- Endpoint ID(s) - select your dashboard
- In the text fields corresponding to the Location update interval parameter, specify the value: "5" and "seconds".

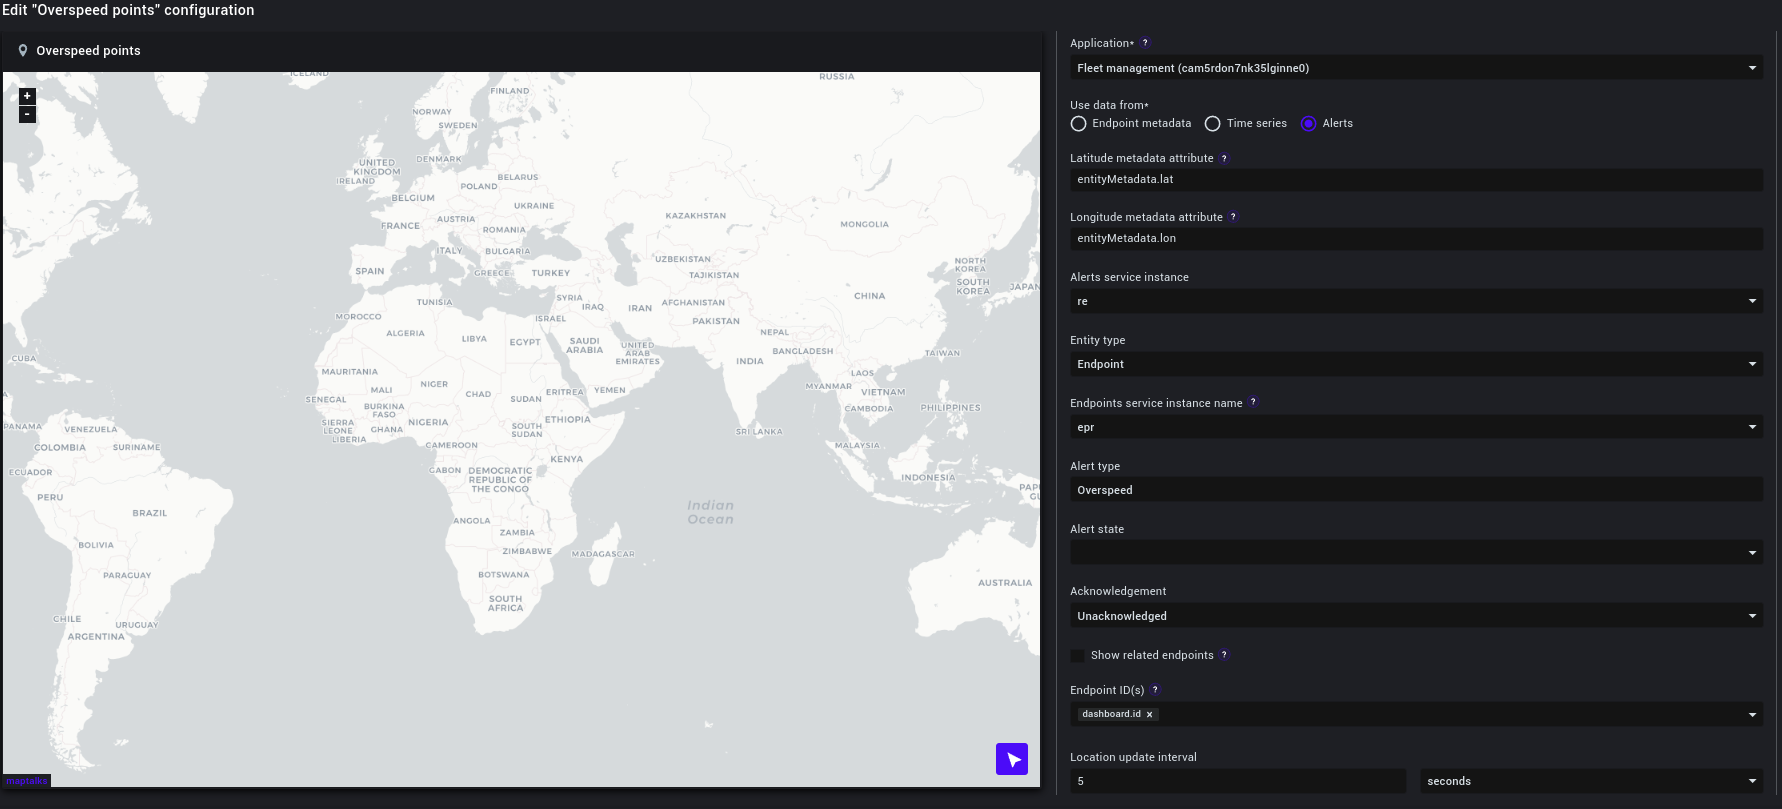
Geopositioning widget to display overspeed points
To create the widget, please follow the steps from the previous widget configuration.
This widget will show virtual points on the map where the speed was exceeded. To do this, use the data from alerts. Also, for customization, in this presentation version, we have replaced the standard markers with red ones.
- Application: select your Solution ("Fleet management (...))
- Use data from: select Alerts
- Set the Latitude value parameter to enityMetadata.lat
- Set the Longitude value parameter to enityMetadata.lon
- Alerts service instance: select re
- Entity type: select Endpoint
- Endpoints service instance name: select epr
- Set the Alert type parameter to Overspeed
- Acknowledgment should be set to Unacknowledged
- Endpoint ID(s): select your dashboard
- In the text fields corresponding to the Location update interval parameter, specify the value "5" and "seconds"
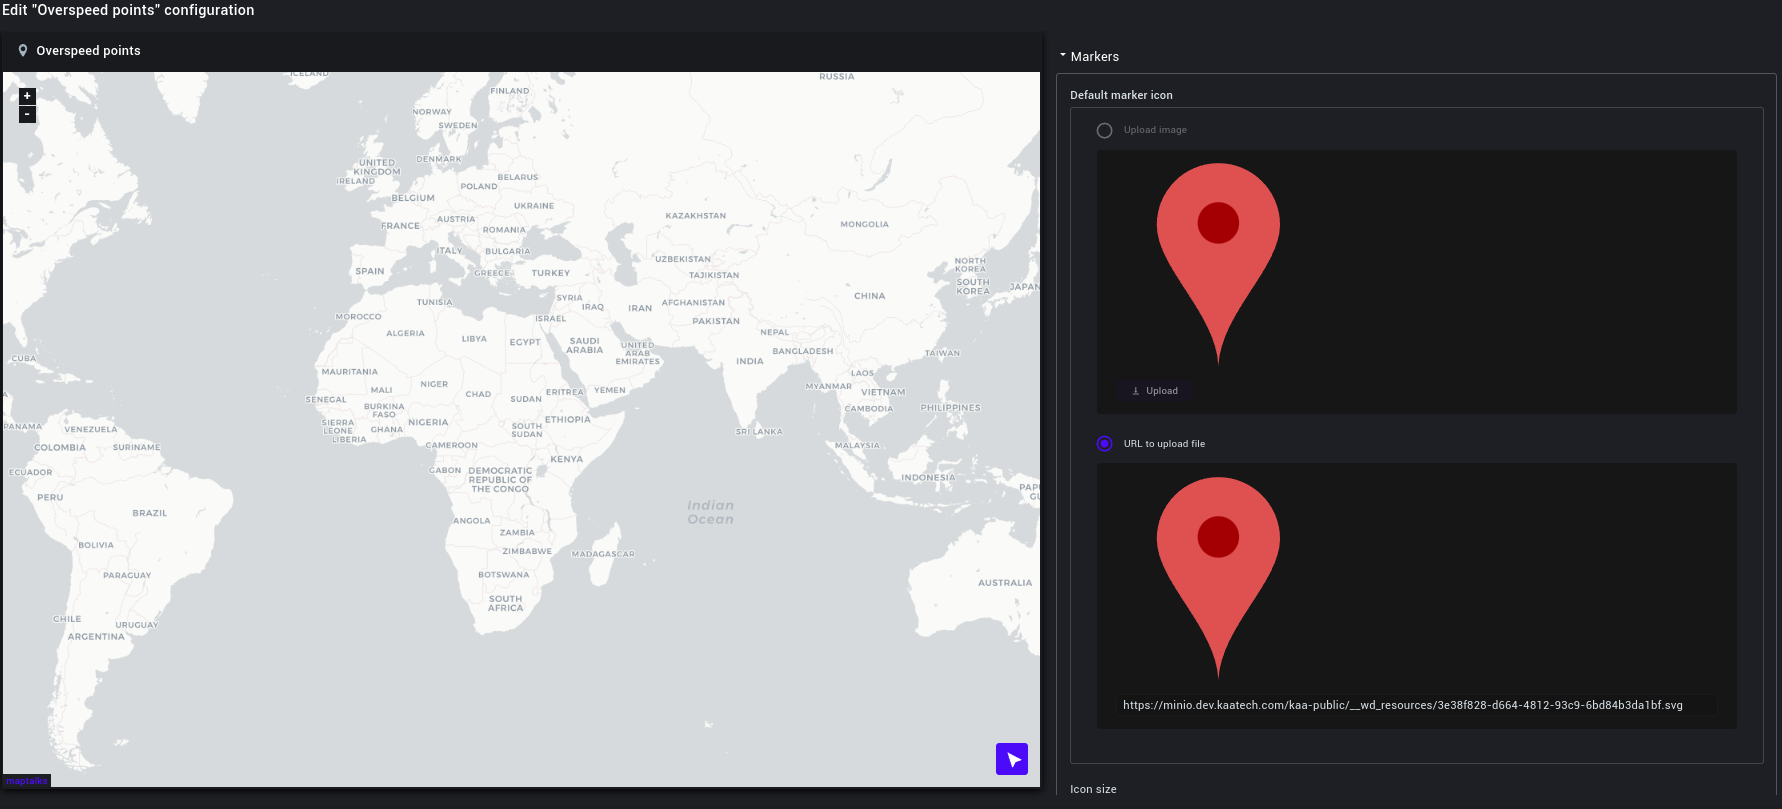
- As for replacing the standard marker with a red one, the Markers section is responsible for this. In this section, using the Default marker icon, you can upload your file with markers using the Upload images function, or simply specify a link to the image of the marker you need in the URL to upload file. We used the second option.
Fleet management simulator configuration
To simulate the movement of a car, you can use FleetSimulator from the fleet management solution template(slightly modifying its code), and publish telemetry data via HTTP. This can be done from the Data publish tab on the Device page. You can also set up a rule to record the device's coordinates from the timestamps in the metadata fields that are responsible for the location of the device.
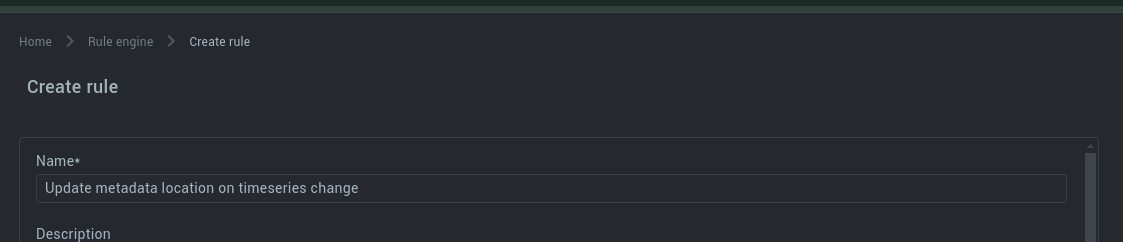
Rule creation
Let’s start with the Rule creation.
1. Go to the Rules on Kaa Cloud
2. Click Create rule
3. Enter the Name (it’s required)
4. Click Add trigger. In our case, there is only one trigger: the timeseries location update
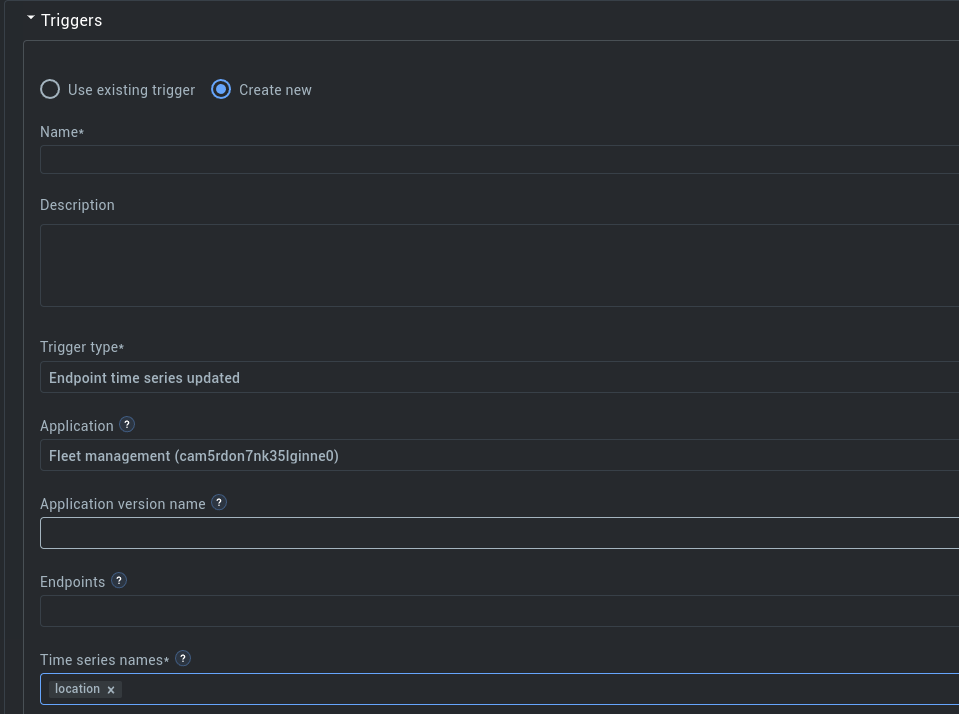
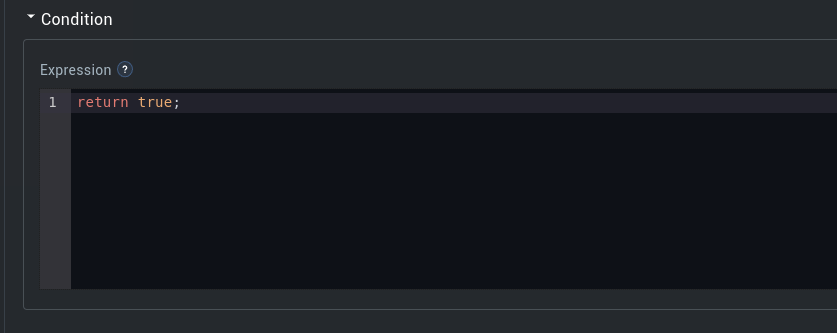
5. Condition always returns true, which means that the rule will be executed every time the trigger is launched.
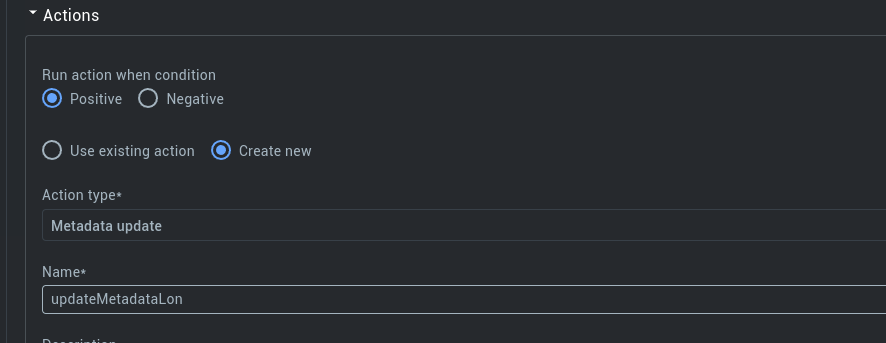
Next, we need to configure the actions that are responsible for updating the longitude and latitude in the metadata. The first action is configured as follows:
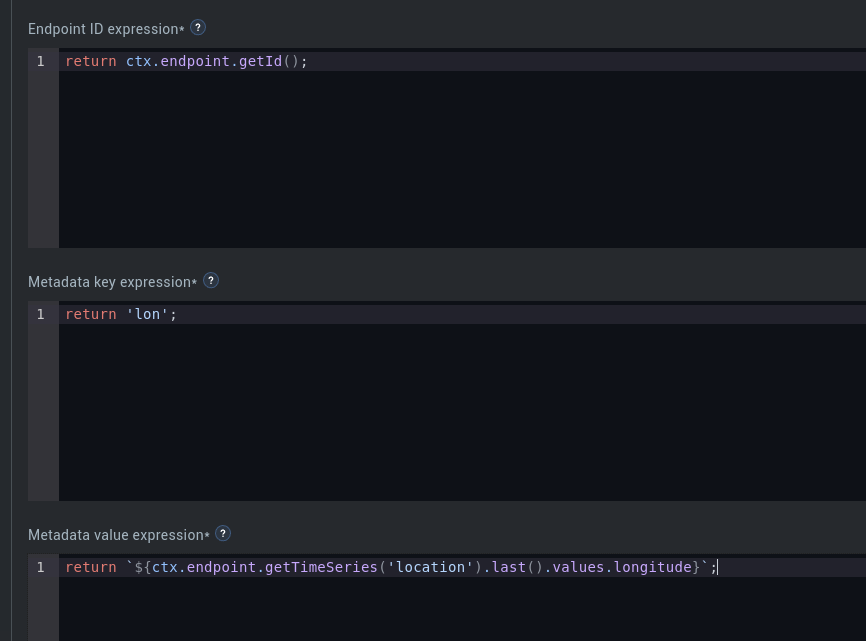
And the second one:
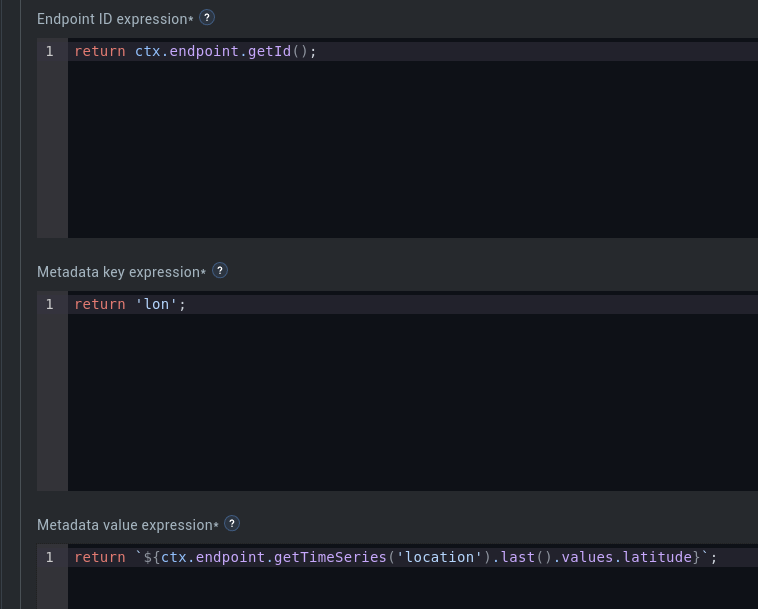
Great! We successfully created the rule.
Simulator configuration
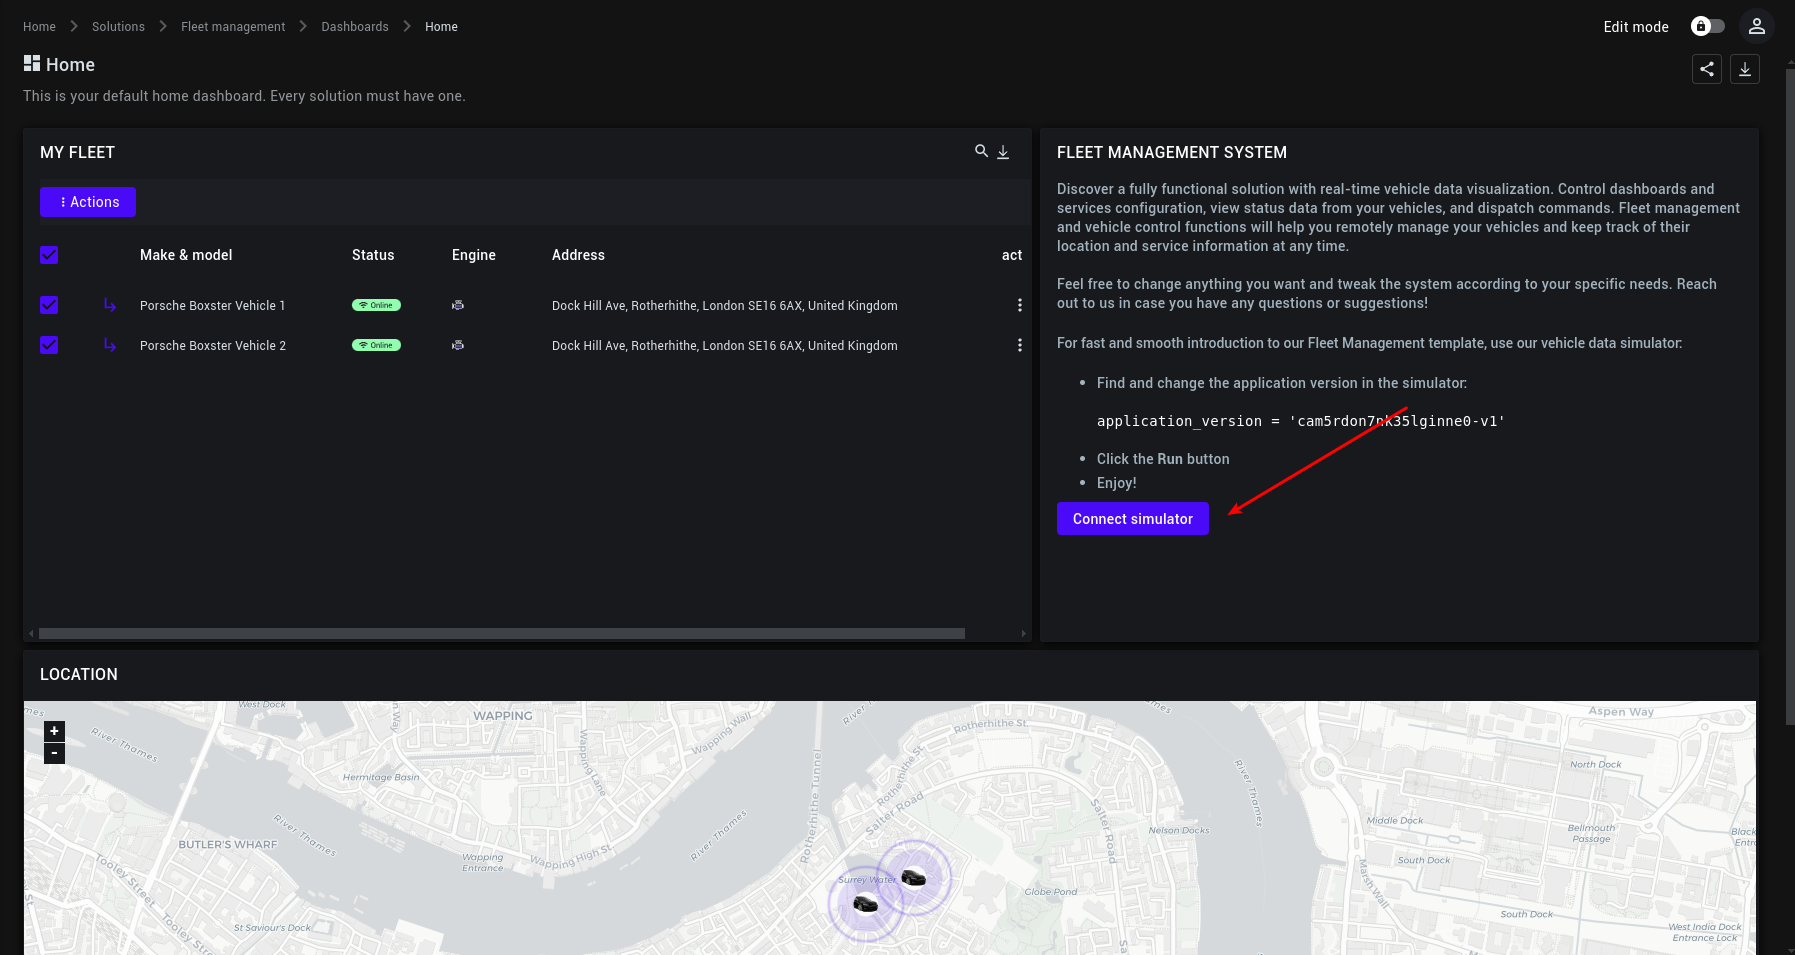
Let’s navigate back to our solution and open the dashboard named “Home”. Click on the Connect simulator button:
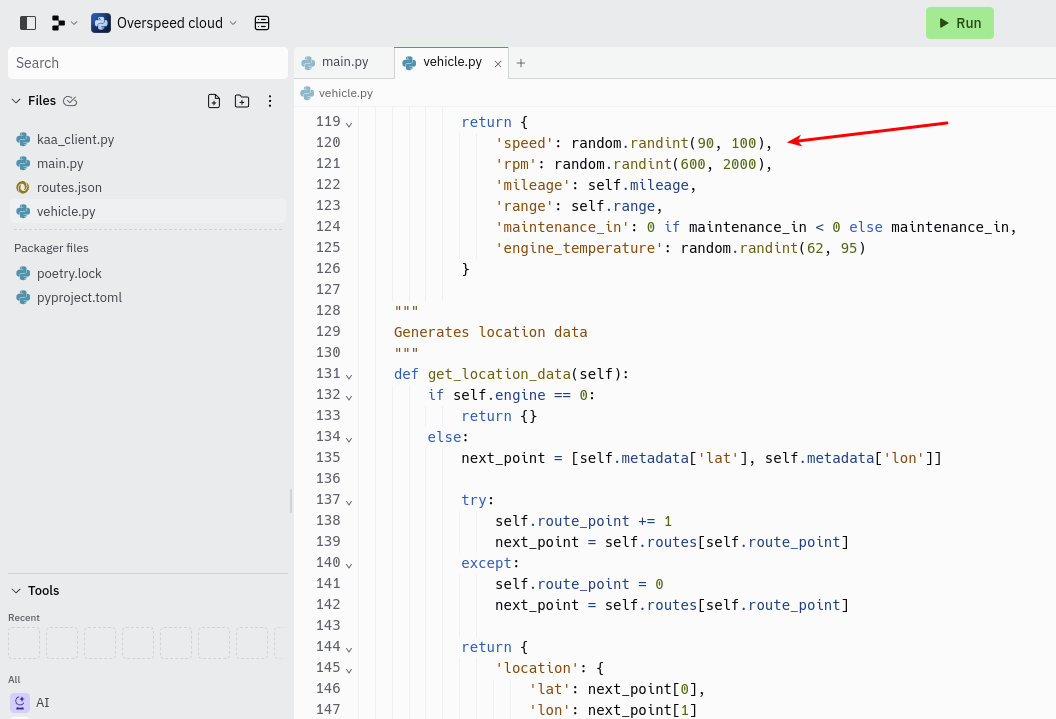
Once clicked, we will be redirected to the simulator configuration. Next, we need to edit the files of our simulator, namely vehicle.py and main.py. In the vehicle.py file, we will be able to set the range of values of the speed of the device we are simulating. In our case, random values from 90 to 100 will be generated (the smaller the difference between the maximum and minimum values, the smoother the movement will seem).
Next, let's move on to the main.py file. In this file, we need to specify the version of our application and the endpoint token. The application version should be specified in line 7, and the token in line 9:

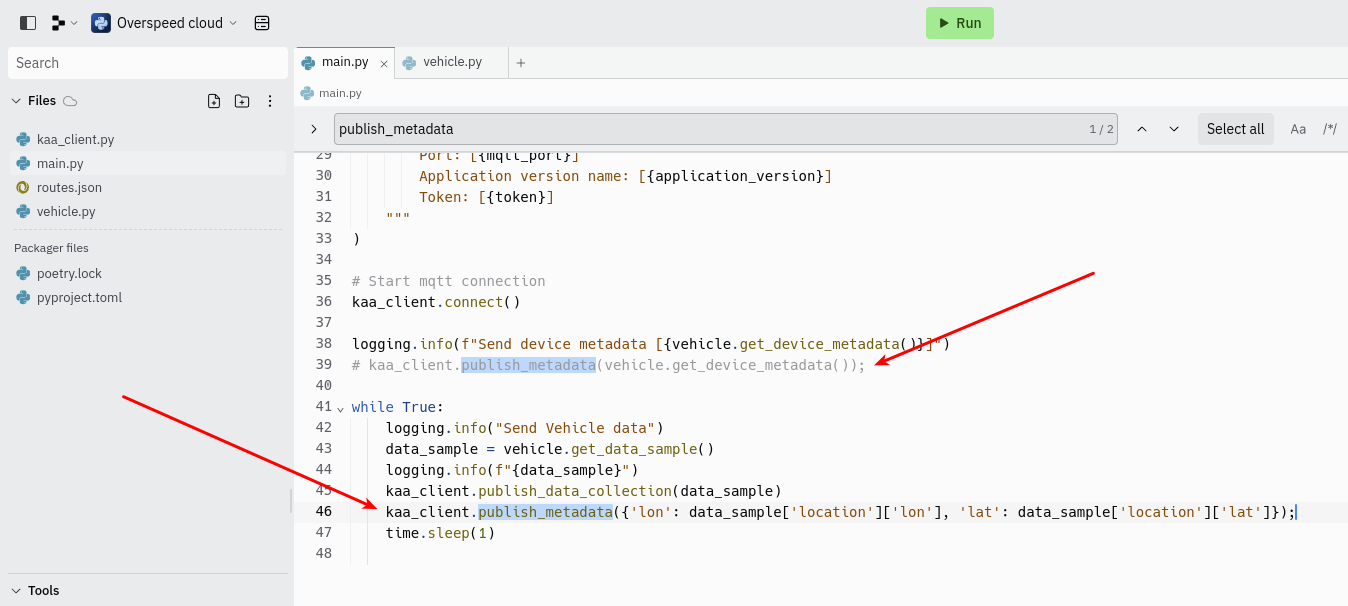
Finally, we will comment on the 39th line:
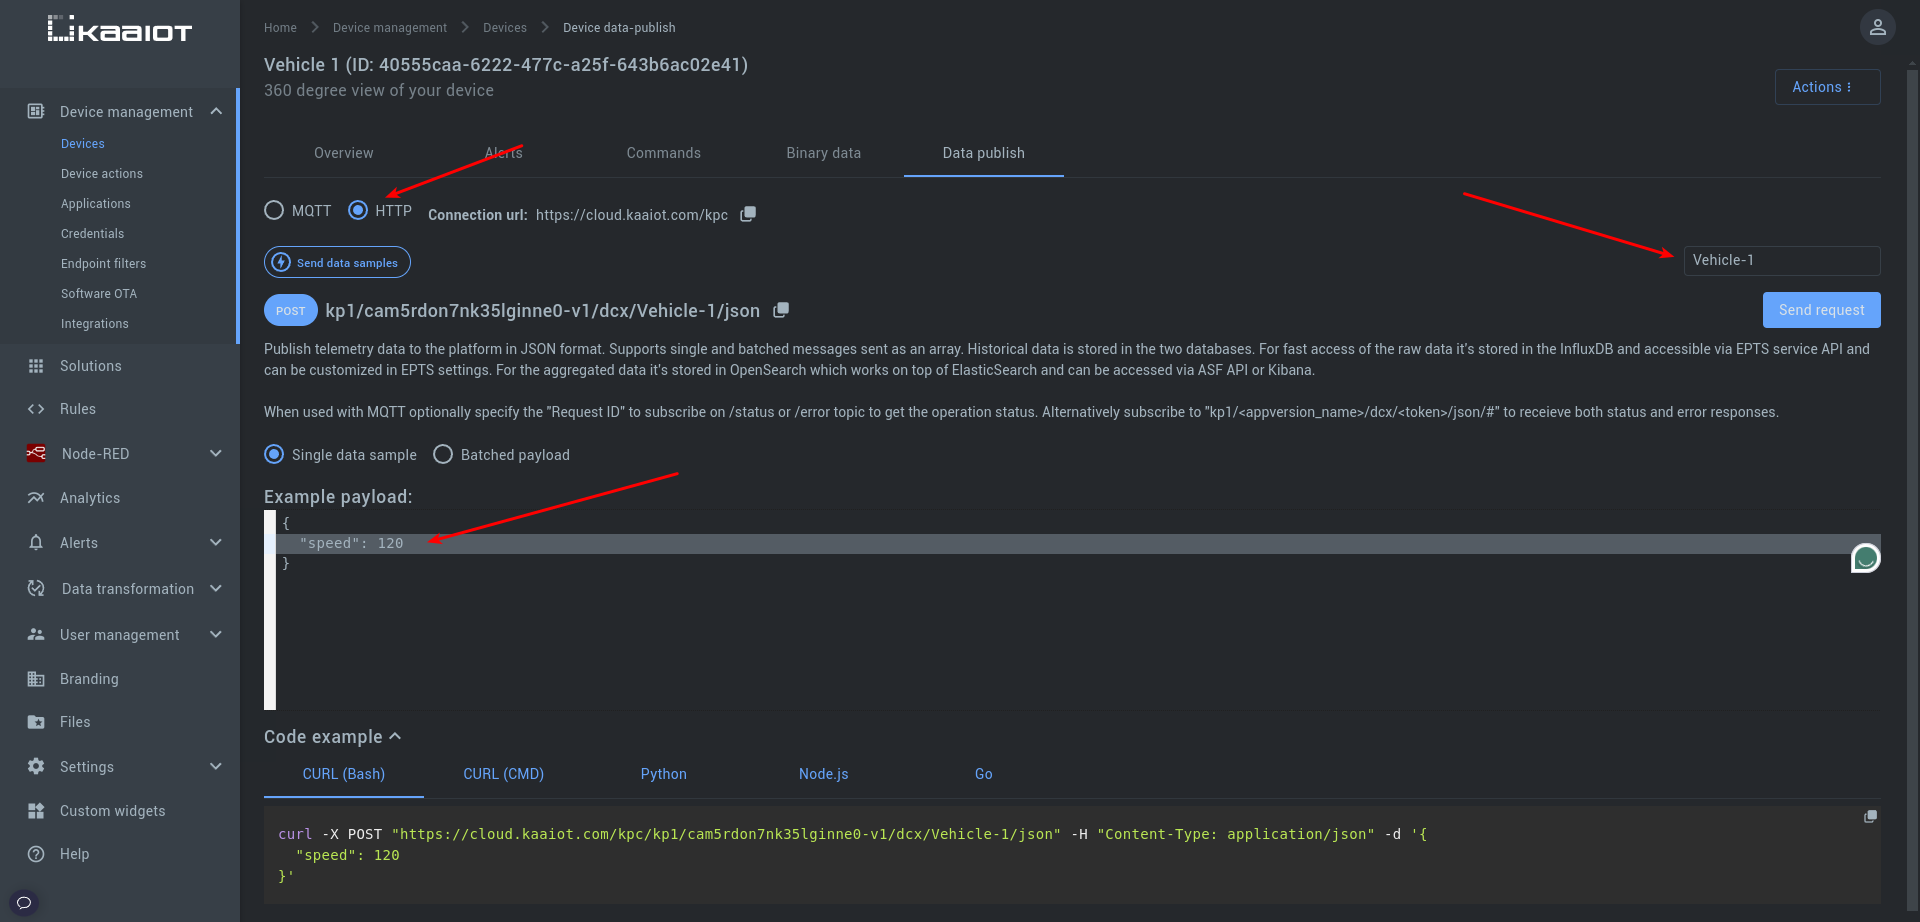
To simulate exceeding the speed limit, navigate to the Device page and access the Data publish tab.
Choose HTTP as the method, input the device token (Vehicle-1), and include an object containing the speed key with a value exceeding the limit specified in the alert settings (>100) within the request payload
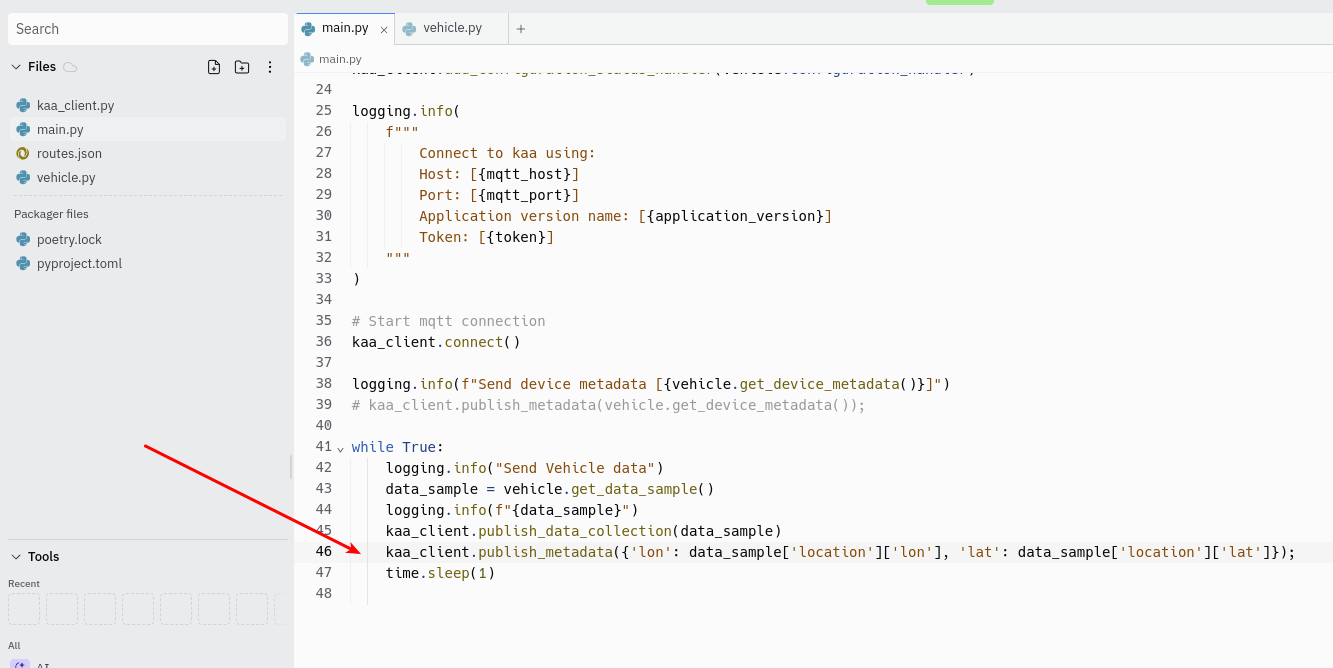
Note: To avoid setting up rules, you can add the following line of code to the end of the main.py file of the replit.com simulator:
“kaa_client.publish_metadata({'lon': data_sample['location']['lon'], 'lat': data_sample['location']['lat']});
so that the latest car coordinates are stored in the endpoint metadata:
Running the fleet management simulator
Click the Run button on Replit, and the simulator is initiated. Here, the speedometer displays the current speed, and the vehicle begins to move on the map. If you submit a speed exceeding 90 via Data Publish, an alert will be generated. You'll find it listed in the alert table, and the map will indicate the location where the vehicle exceeded the speed limit.

Conclusion
In this tutorial, we've walked through setting up an overspeed detection solution using the Kaa IoT Platform, specifically tailored for fleet management scenarios. By leveraging Kaa's features, we've configured alerts to detect instances of overspeeding, created widgets to visualize speed data, alert notifications, and the location history of fleet vehicles, and finally, simulated fleet movement to test our solution.
By following the steps outlined in this tutorial, you've gained insights into how IoT technologies can be applied to enhance safety and compliance in transportation operations. Whether you're a developer exploring advanced IoT functionalities or an organization seeking to optimize fleet management systems, the Kaa IoT Platform offers a robust framework for building tailored solutions to meet your specific needs.
With the overspeed detection solution now implemented, you're better equipped to monitor vehicle speeds effectively, detect potential safety hazards, and take proactive measures to ensure compliance with speed regulations.
Do you want to learn more about this solution? Reach out to our IoT experts to find out how we can help your IoT initiatives.
Related Stories

KaaIoT & TEKTELIC partner to simplify IoT development with pre-integrated hardware & software solutions....

KaaIoT and Supermicro offer a combined solution for AI-powered IoT applications at the network's edge...

Uncover the potential benefits of machine condition monitoring in reducing downtime and increasing overall productivity...

Unlock insights into challenges, best practices & solutions for seamless IoT device management with our in-depth guide.